|

How to Torque up stretch cylinder head bolts.
Stretch head bolts were introduced by Land Rover in approx. 1993/4 when they introduced 10 bolt cylinder heads on the serpentine style engines. And although used as standard on these engines they can also be used, and are preferred by us, on the earlier 3.5, 3.9 and 4.2 litre engines. Along with stretch head bolts we would always use composite head gaskets.
Stretch bolts do not just torque up, these are tightened to a specific torque setting and are then rotated a certain degree (and in the case of head bolts this is done twice)
10 bolt and 14 bolt heads.
All early Rover V8 engines were fitted with 14 bolt cylinder heads, it was not until the serpentine style engine was introduced in 1993/4 that the 10 bolt head was designed.
14 Bolt head blanking plugs.
If you are using 14 bolt heads on one of our coscast 10 bolt blocks then we can supply some blanking plugs for the bottom row of 4 head bolts that are no longer required.
However if you are still using an old 14 bolt block then you can re-use the 4 bolts that are fitted to the lower row. However these are only to be torqued to 20NM with lock tight applied. This is simply so they have no effect but fill the holes. This is to be done after torqing the main 10 bolts up as detailed below.
Torque specification.
Firstly it is important to tighten the head bolts up in the correct order so that the head pulls down squarely. As you can see below you work from the inside outwards.
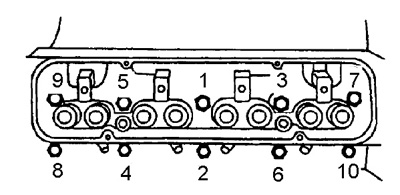
Start by torqing the stretch bolts down to 25NM in the correct order.
It is now a good idea to mark each head bolt with Tippex (or any other brand of white marker) Mark it from the centre upwards in a line.
Next turn each bolt through 90 degrees clockwise. Again in the same order starting from the centre. Once done all white lines should be to the right.
Finally turn each bolt through 90 degrees again in the correct order so that all lines are pointing down.
Check all white marks are pointing down.
| 
